更多优质内容
请关注公众号
请关注公众号

本节简单介绍go web编程并用go构建一个服务器。
例子:快速搭建一个go web服务器
package main

import (
	"fmt"
	"log"
	"net/http"
)

func sayHello(resp http.ResponseWriter, req *http.Request){
	_ = req.ParseForm()		// 对于get请求而言ParseForm()会解析请求参数,对于post而言会解析请求body中的数据
	fmt.Println(req.URL.Path)		// 请求行中的uri

	for k, v := range(req.Form){	// 参数数据
		fmt.Printf("key: %s , value: %s\n", k, v)
	}

	name := req.Form.Get("name")
	//resp.Write([]byte(fmt.Sprintf("hello, %s", name)))
	fmt.Fprintf(resp, "hello, %s", name)		// 向客户端返回响应数据
}

func main(){
	http.HandleFunc("/", sayHello)		// 注册路由
	err := http.ListenAndServe(":8080", nil)	// 创建web服务,监听8080端口,不限定ip
	if err != nil{
		log.Fatal("ListenAndServe:" + err.Error())
	}
}
执行
go run main.go
访问127.0.0.1:8080?name=zbp即可看到内容
我们针对上面的代码说明一下整个过程发生了什么。
1. 在main方法中,执行了两个方法 http.HandleFunc 和 http.ListenAndServe。
源码中HandleFunc方法如下
func HandleFunc(pattern string, handler func(ResponseWriter, *Request)) {
	DefaultServeMux.HandleFunc(pattern, handler)
}http.HandleFunc方法调用了DefaultServeMux(默认的ServeMux)的HandleFunc方法,而DefaultServeMux是http.ServeMux类型。http.ServeMux是一个http请求多路复用器,他可以将多个路径和路径对应的handler(处理函数)存储到一个map中。
http.ServeMux类型结构如下:
type ServeMux struct {
	mu    sync.RWMutex
	m     map[string]muxEntry
	es    []muxEntry // slice of entries sorted from longest to shortest.
	hosts bool       // whether any patterns contain hostnames
}
其中 m 属性就是存放 路径 和 handler的map,即路由表。
再看DefaultServeMux.HandleFunc(pattern, handler)方法的内部
func (mux *ServeMux) HandleFunc(pattern string, handler func(ResponseWriter, *Request)) {
	if handler == nil {
		panic("http: nil handler")
	}
	mux.Handle(pattern, HandlerFunc(handler))    // 将sayHello封装为http.HandlerFunc类型
}它会先将sayHello封装为http.HandlerFunc类型(满足http.Handler接口类型),并将pattern("/")和封装好的handler添加到上面说的路由表中。
简单的说 ServerMux的作用有2个:保存路由表 和 当请求过来时解析请求中的uri并执行该uri到对应的handler方法(也就是sayHello方法)
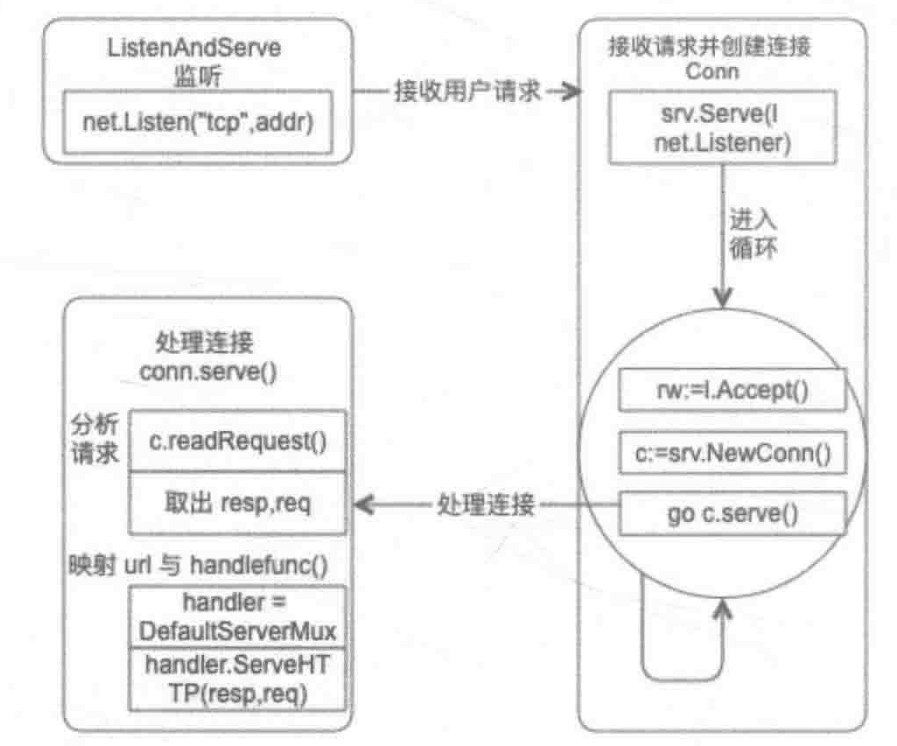
2. 当调用ListenAndServe方法时,程序会委托操作系统创建一个套接字,并且绑定和监听8080端口,然后无限循环接收客户端连接和请求,在没有连接和请求到来的时候会阻塞主程序。由于没有指定ip因此相当于该程序对所有ip开放。第二参传入nil表示使用默认的ServerMux。
每当有一个客户端的新连接进来,ListenAndServe就会创建一个goroutine来处理该连接下所有的请求。
源码如下所示
func (srv *Server) Serve(l net.Listener) error {
	if fn := testHookServerServe; fn != nil {
		fn(srv, l) // call hook with unwrapped listener
	}

	origListener := l
	l = &onceCloseListener{Listener: l}     // l是一个net.http对象,可以接收和关闭连接
	defer l.Close()

    // ...略过一些细节

	var tempDelay time.Duration

	ctx := context.WithValue(baseCtx, ServerContextKey, srv)    // 上下文对象
	for {
		rw, err := l.Accept()   // 接受连接,如果没有连接到来则阻塞;rw是接收到的某个客户端连接,是一个net.Conn接口类型
		if err != nil {     // 当连接到来但接收失败时的重试机制
			select {
			case <-srv.getDoneChan():
				return ErrServerClosed
			default:
			}
			if ne, ok := err.(net.Error); ok && ne.Temporary() {
				if tempDelay == 0 {
					tempDelay = 5 * time.Millisecond
				} else {
					tempDelay *= 2
				}
				if max := 1 * time.Second; tempDelay > max {
					tempDelay = max
				}
				srv.logf("http: Accept error: %v; retrying in %v", err, tempDelay)
				time.Sleep(tempDelay)
				continue
			}
			return err
		}
		connCtx := ctx
		if cc := srv.ConnContext; cc != nil {
			connCtx = cc(connCtx, rw)
			if connCtx == nil {
				panic("ConnContext returned nil")
			}
		}
		tempDelay = 0
		c := srv.newConn(rw)    // 将rw进一步封装为 http.conn类型,其实质还是一个客户端连接
		c.setState(c.rwc, StateNew)
		go c.serve(connCtx)     // 开启一个新的goroutine来处理这个客户端请求
	}
}
在 c.serve()中做了很多的事情,但是最关键的事情是调用了ServeMux.match()根据请求中的uri获取到对应的handler处理程序(即封装了sayHello函数的Handler对象),并且调用其ServeHTTP方法,这个方法内部其实调用了注册路由时注册的方法(即sayHello里面的逻辑)。
在调用ServeHTTP时会传入http.Request和http.ResponseWriter对象,他们分别代表请求和响应。
整体流程如下所示
本节简单的介绍到这里,感兴趣的朋友可以参考《go web编程》一书