请关注公众号


任务:主从复制 + 读写分离 + 负载均衡
主:54.22.37.21
从1:54.22.37.20
从2:54.22.37.19
均衡:204.175.124.51
操作对象:test数据库
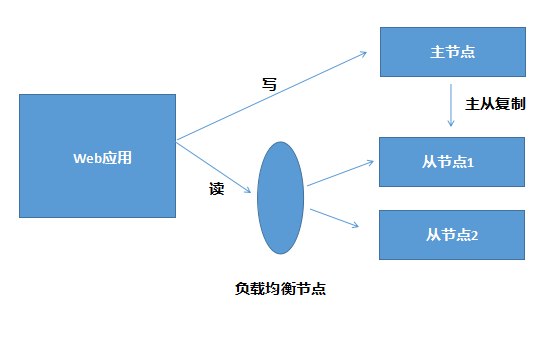
架构图如下:

简易Mysql负载均衡配置架构图
========================= 主节点配置 =========================
# 授权一个允许从节点主从复制的用户repl
grant replication slave on *.* to 'repl'@'54.22.37.%' identified by "xxxxx";
# 开启二进制日志
server-id =21
log-bin = /var/lib/mysql/mysql-bin
log-bin-index = /var/lib/mysql/mysql-bin.index
binlog_format = mixed
expire_logs_days    = 10
max_binlog_size   = 100M
# 重启服务
# 备份test数据库
# 获取master状态
show master status
+------------------+----------+--------------+------------------+-------------------+
| File             | Position | Binlog_Do_DB | Binlog_Ignore_DB | Executed_Gtid_Set |
+------------------+----------+--------------+------------------+-------------------+
| mysql-bin.000007 |   921390 |              |                  |                   |
+------------------+----------+--------------+------------------+-------------------+
================== 从节点1(54.22.37.20)配置 =====================
# 尝试远程连接一下
# 创建test库并导入test
# 配置同步日志
server-id = 20
relay-log = /var/lib/mysql/relay-bin
relay-log-index = /var/lib/mysql/relay-bin.index
replicate-do-db = test
slave-skip-errors = all
PS:这里我没有开启二进制日志,只开启了同步日志
# 指向主节点
stop slave;     # 先停止之前的同步
reset slave;    # 清空之前的同步
change master to master_host="54.22.37.21",master_user="repl",master_password="xxxxx",master_log_file="mysql-bin.000007",master_log_pos=921390;     #指向主节点
start slave;    # 开启同步
# 查看同步的状态
show slave status;
*************************** 1. row ***************************
               Slave_IO_State:
                  Master_Host: 54.22.37.21
                  Master_User: repl
                  Master_Port: 3306
                Connect_Retry: 60
              Master_Log_File: mysql-bin.000007
          Read_Master_Log_Pos: 921390
               Relay_Log_File: relay-bin.000001
                Relay_Log_Pos: 4
        Relay_Master_Log_File: mysql-bin.000007
             Slave_IO_Running: No
            Slave_SQL_Running: Yes
              Replicate_Do_DB: test
          Replicate_Ignore_DB:
           Replicate_Do_Table:
       Replicate_Ignore_Table:
      Replicate_Wild_Do_Table:
  Replicate_Wild_Ignore_Table:
                   Last_Errno: 0
                   Last_Error:
                 Skip_Counter: 0
          Exec_Master_Log_Pos: 921390
              Relay_Log_Space: 154
              Until_Condition: None
               Until_Log_File:
                Until_Log_Pos: 0
           Master_SSL_Allowed: No
           Master_SSL_CA_File:
           Master_SSL_CA_Path:
              Master_SSL_Cert:
            Master_SSL_Cipher:
               Master_SSL_Key:
        Seconds_Behind_Master: NULL
Master_SSL_Verify_Server_Cert: No
                Last_IO_Errno: 1593
                Last_IO_Error: Fatal error: The slave I/O thread stops because master and slave have equal MySQL server UUIDs; these UUIDs must be different for replication to work.
               Last_SQL_Errno: 0
               Last_SQL_Error:
  Replicate_Ignore_Server_Ids:
             Master_Server_Id: 86
                  Master_UUID:
             Master_Info_File: /var/lib/mysql/master.info
                    SQL_Delay: 0
          SQL_Remaining_Delay: NULL
      Slave_SQL_Running_State: Slave has read all relay log; waiting for more updates
           Master_Retry_Count: 86400
                  Master_Bind:
      Last_IO_Error_Timestamp: 200115 20:13:05
     Last_SQL_Error_Timestamp:
               Master_SSL_Crl:
           Master_SSL_Crlpath:
           Retrieved_Gtid_Set:
            Executed_Gtid_Set:
                Auto_Position: 0
         Replicate_Rewrite_DB:
                 Channel_Name:
           Master_TLS_Version:
显示同步失败
重点看这几个地方
Slave_IO_Running: No
Slave_SQL_Running: Yes
Replicate_Do_DB: test
Last_IO_Error: Fatal error: The slave I/O thread stops because master and slave have equal MySQL server UUIDs; these UUIDs must be different for replication to work.
同步失败的原因在Last_IO_Error说的很明白,具有相同的UUID,这是因为
主:54.22.37.21
从1:54.22.37.20
从2:54.22.37.19
这三台服务器是从一个镜像拷出来的,所以,他们mysql的UUID是相同的。
我们只要将UUID该成不同的就行:
show variables like "%uuid%";   # 查看当前uuid
select uuid();                  # 生成一个新的uuid,复制该uuid
show varialbes like "%datadir"  # 查看数据目录位置,uuid文件的存放位置也在这里,yum安装的mysql一般在/var/lib/mysql
# 修改/var/lib/mysql/auto.cnf uuid就写在这个文件里
[auto]
server-uuid=dd8d34de-be32-11e9-931e-04155d871a13
将其修改为刚刚复制的uuid
重启服务
# 重新检查同步状态
show slave status;
*************************** 1. row ***************************
Slave_IO_State: Waiting for master to send event
Master_Host: 54.22.37.21
Master_User: repl
Master_Port: 3306
Connect_Retry: 60
Master_Log_File: mysql-bin.000007
Read_Master_Log_Pos: 921390
Relay_Log_File: relay-bin.000003
Relay_Log_Pos: 320
Relay_Master_Log_File: mysql-bin.000007
Slave_IO_Running: Yes
Slave_SQL_Running: Yes
Replicate_Do_DB: test
...
同步成功;
================== 从节点2(54.22.37.19)配置 =====================
做和从节点1相同的操作
在主节点测试插入几条数据试试,看看是否同步。
================== 负载均衡节点配置(204.175.124.51) ===============
# 安装和配置好haproxy(之前章节有安装和配置的步骤操作)
配置好的haproxy的配置文件内容如下:
global
    daemon
    nbproc  1
    pidfile /usr/local/haproxy/conf/haproxy.pid  # 这个待会要自己建

defaults
    mode tcp        # 默认的模式(tcp|http|health),tcp是4曾,http是7层,health只返回OK
    retries 2       # 两次连接失败就认为服务器不可用,也可以通过后面设置
    option redispatch   # 当server选项指定的服务器挂掉后,强制定向到其他健康的服务器
    option abortonclose     #当服务器负载很高,自动结束当前队列处理的比较久的连接
    maxconn 4096        # 默认最大连接数
    timeout connect 5000ms  #连接超时时间
    timeout client 30000ms  #客户端超时
    timeout server 30000ms  #服务器超时
    log 127.0.0.1 local0 err

listen test1        # 配置负载均衡的节点,test1是名字,可以随意
    bind 0.0.0.0:3300   # haproxy服务监听的IP和端口,这里的0.0.0.0就是本机
    mode tcp    # 数据库连接,肯定是tcp协议,这里其实可以不指定,因为前面已经指定过了

    server s1 54.22.37.19:3306    # 指定从节点1的IP和端口
    server s2 54.22.37.20:3306    # 指定从节点2的IP和端口
PS:由于负载均衡本身就有mysql,mysql占用了3306端口。所以,haproxy绑定3300端口以防止冲突。
haproxy只需指定从节点,只和从节点连接。主节点只有一个只负责写,由业务层直接连接,无需由haproxy连接。haproxy会对查询请求平均分配到两个从节点。
# 创建haproxy.pid文件
cd /usr/local/haproxy/conf && touch haproxy.cfg && echo 1>haproxy.cfg
chmod 755 haproxy.cfg
================== 从节点授权用户给负载均衡节点 ===============
# 在正式启动haproxy服务之前,先在所有从节点创建一个供负载均衡节点连接到从节点的用户
我们可以这样,修改从节点1和从节点2的配置文件,加多一条 replicate-do-db=mysql,然后重启mysql
表示从节点同步mysql库
然后在主节点创建和授权这个供负载均衡节点使用的用户,这样所有从节点就也都有这个用户了
grant all on *.* to "haproxy"@"204.175.124.51" identified by "xxxxx"
创建了haproxy用户给ip 204.175.124.51(负载均衡节点),拥有所有权限。
最后回到负载均衡节点,我们启动haproxy服务
haproxy -f /usr/local/haproxy/conf/haproxy.cfg # 指定配置文件启动haproxy,haproxy命令已添加到环境变量
========================= 测试 ========================
最后我们进行测试,如果你的负载均衡节点没有设置防火墙,那么可以直接在本地进行测试:
mysql -h204.175.124.51 -uhaproxy -P3300 -pxxxxx # 这里就像连mysql一样去连负载均衡节点的的haproxy服务即可,这里表面上像是连204.175.124.51的mysql,其实连的是该节点的haproxy服务。
show variables like "%server_id%"; # 查看所连的节点的server-id
过多一段时间再执行一次上面的查询,发现显示的server-id不同,就说明haproxy将请求分配到了两个从节点,通过连接haproxy可以访问到两个从节点。
这里说一下整个连接的过程:
应用层------->请求负载均衡节点的haproxy服务
负载均衡节点haproxy-------->通过一定算法,请求两台从节点中的一台
应用层请求的是负载均衡节点的haproxy服务,而不是它的mysql服务,所以负载均衡节点的mysql就算关闭了或者根本没安装mysql都没事。
只要负载均衡节点没有设置防火墙,应用层在执行mysql -h204.175.124.51 -uhaproxy -P3300 -pxxxxx的时候都可以连接到haproxy服务
在负载均衡节点上,haproxy服务使用在应用层输入的mysql的用户名和密码去请求从服务器,所以在从节点授权用户的时候,授权的ip不是应用层的IP,也不是从节点的ip,而是负载均衡节点的ip,因为这个用户是给负载均衡节点用的。应用层无法直接连到从节点,因为从节点没有授权用户给应用层。
================== 限制客户端连接负载均衡节点 ===============
最后为了安全起见,要给均衡节点设置防火墙,限定特定的ip或者ip段才能连接负载均衡节点
我的Linux是Centos 7.2版本,防火墙是firewalld命令
系统是默认不开启防火墙的。接下来介绍一些简单的防火墙知识和命令
systemctl status firewalld  # 查看防火墙状态
systemctl stop firewalld    # 关闭防火墙
systemctl start firewalld   # 开启防火墙
systemctl is-enabled firewalld  #查看防火墙是否开机自启
systemctl enable firewalld.service  # 开机自启防火墙
systemctl disable firewalld.service # 开机禁用防火墙

firewalld-cmd 基本使用
firewall 可以看成整个防火墙服务,而firewall-cmd可以看成是其中的一个功能,可用来管理端口和ip

firewall-cmd --zone=public --list-ports  # 查看开放的所有端口

firewall-cmd --zone=public --list-ports  # 查看所有开放的情况

firewall-cmd --zone=public --add-port=80/tcp --permanent    # 开放80端口,永久有效。必须重新加载才能生效:firewall-cmd --reload

firewall-cmd --zone=public --remove-port=9898/tcp --permanent  #关闭指定端口
firewall-cmd对端口的操作,如开放端口等信息,都放在在"/etc/firewall/zones/public.xml"中记录
上面是对端口的操作。
如果想针对IP和端口设置如下:
firewall-cmd --permanent --zone=public --add-rich-rule="rule family=ipv4 source address='192.168.10.0/24' service name='ssh' drop"
# 表示192.168.10这个IP段的用户无法通过ssh远程连接这个机器 service name='ssh' 表示对哪个服务进行操作。


firewall-cmd --permanent --zone=public --add-rich-rule="rule family='ipv4' source address='192.168.10.50' port port=22 protocol=tcp reject"
# 表示对192.168.10.50这个用户禁掉22端口

firewall-cmd --permanent --zone=public --add-rich-rule="rule family=ipv4 source address='192.168.10.50' port port=22 protocol='tcp' accept"
# 允许该用户连接22端口

drop和reject都是禁止连接,只不过方式不同。推荐使用reject。

如果要取消上一条的设置,比如取消掉accept这个操作,使用--remove-rich-rule即可
firewall-cmd --permanent --remove-rich-rule="rule family=ipv4 source address='192.168.10.50' port port=22 procotol='tcp' accept"
记得最后要 firwall-cmd --reload 才能生效
那么接下来我们设置只允许某ip段的用户连接负载均衡节点。
# 我的服务器默认没有开启防火墙,所以现在任何服务器都能连接我服务器的任何端口,所以haproxy自然也可以连接
# 现在开启防火墙
service firewalld start
# 这个时候,任何IP都连不了我的任何端口;所以我自己的博客网打不开了(80端口),但是可以通过ssh远程连接服务器,因为firewall默认允许ssh服务连接。
# 现在开启80端口,让我的博客网能够访问:
firewall-cmd --zone=public --add-port=80/tcp --permanent # 这一步你们可以不用设置
# 对173.12.234这个IP段(这是家里的WiFi的IP段)开启3300这个端口,让它可以连接haproxy服务
firewall-cmd --permanent --zone=public --add-rich-rule="rule family=ipv4 source address='173.12.234.0/24' port port=3300 protocol='tcp' accept"
# 让其生效
firewall-cmd --reload
这样只有这个ip段能够连接haproxy,安全性大大增加。
在实际开发中,应该将负载均衡节点分配给应用层所在的服务器的ip或者IP段,因为只有这些服务器才会去连负载均衡节点去请求数据。
还有,由于从节点只负责读数据,所以从节点授权用户给负载均衡节点时,只用授权select权限即可,不用授权所有权限。这样即使有其他人连上了haproxy,也无法对数据进行删除或修改。
==================================================================
最后,配置一下Web应用连接mysql集群,以TP5为例,配置其根目录下/config/database.php。
该Web应用直接部署在负载均衡服务器204.175.124.51上。并在主节点授权一个增删改权限的用户zbpblog给Web应用(即负载均衡节点)
<?php
return [
    // 数据库类型
    'type'            => 'mysql',
    // 服务器地址
    'hostname'        => ["54.22.37.21",'127.0.0.1'],       # TP5默认该参数中第一个节点是主节点,之后的节点是从节点;这里虽然只指定了一个从节点的ip,但其实这个ip是haproxy代理,其实有两个从节点。假如没有使用haproxy进行负载均衡,这里应该写成 ["54.22.37.21",'54.22.37.20','54.22.37.19']
    // 数据库名
    'database'        => 'test',                            # 主节点和从节点的库名都是test
    // 用户名
    'username'        => ['zbpblog',"haproxy"],             # 主节点授权zbpblog给负载均衡节点,从节点授权haproxy用户给负载均衡节点
    // 密码
    'password'        => ['xxxxx',"xxxxx"],
    // 端口
    'hostport'        => ['3306','3300'],                   # 负载均衡节点的haproxy监听的是3300
    // 连接dsn
    'dsn'             => '',
    // 数据库连接参数
    'params'          => [],
    // 数据库编码默认采用utf8
    'charset'         => 'utf8',
    // 数据库表前缀
    'prefix'          => '',
    // 数据库调试模式
    'debug'           => true,
    // 数据库部署方式:0 集中式(单一服务器),1 分布式(主从服务器)
    'deploy'          => 1,                                 # 表示使用mysql分布式集群
    // 数据库读写是否分离 主从式有效
    'rw_separate'     => true,                              # 表示要读写分离,主库写,从库读
    // 读写分离后 主服务器数量
    'master_num'      => 1,                                 # 表示只有一个主节点,如果master_num>1,则默认前n个节点是主节点,其他为从节点
    // 指定从服务器序号
    'slave_no'        => [1],
    // 自动读取主库数据
    'read_master'     => false,
    // 是否严格检查字段是否存在
    'fields_strict'   => true,
    // 数据集返回类型
    'resultset_type'  => 'array',
    // 自动写入时间戳字段
    'auto_timestamp'  => false,
    // 时间字段取出后的默认时间格式
    'datetime_format' => 'Y-m-d H:i:s',
    // 是否需要进行SQL性能分析
    'sql_explain'     => false,
    // Builder类
    'builder'         => '',
    // Query类
    'query'           => '\\think\\db\\Query',
    // 是否需要断线重连
    'break_reconnect' => false,
    // 断线标识字符串
    'break_match_str' => [],
];
