请关注公众号


· 位图
位图是内存中连续的二进制位(bit)所组成的数据结构,该算法主要用于对大量整数做去重和查询操作。
位图的每一个位都有自己下标,从0开始,且位图下标的递增是从右到左的(大端表示法)。每一个位的值只能是0和1。
例如我想往一个大小为10bite的位图中插入4,2,1,3这4个值,那么就需要在下标为4,2,1,3的位上设置值为1:

位图的实现
位图不像整型、字符类型这种简单的数据类型被各种语言直接支持,由于一个位图有成千上万位,因此需要用一个long型(64位)的数组把所有的位连起来。下面为了画图方便,我们使用4位整型的数组代替long型数组。
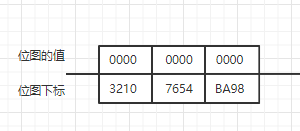
依旧是以10bite的位图为例,该位图用4位整型的数组表现为:

上图中,每一个数组元素都有4个位,一共有12个位,每个位的下标在自己的数组元素内是从右到左递增的,在元素与元素之间是从左到右递增的。但在逻辑上我们把它当做是下标从右到左递增的。
在下标为4,7,9,3的位上设置值为1后变成:

Q2:如何把某个位下标的值设为0或者1?
假设位下标为 i。
1.先找到位下标对应的数组下标
idx = math.floor(i / 4)
2.让arr[idx]中对应的位与 1 << i进行|运算可置为1,与^(1 << i)进行&运算可置为0
即 arr[idx] | (1 << i) 可将下标i的位置为1,arr[idx] & ^(1 << i) 可将下标i的位置为0。
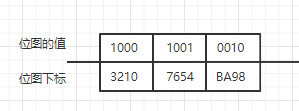
例如下图:

我想把位下标为6的位置为1。已知它所在的数组元素是arr[1]。
则 arr[2] = arr[2] | (1 << 6) = 1001 | 0100 = 1101
我想把位下标为7的位置为1。已知它所在的数组元素是arr[1]。
则 arr[2] = arr[2] & ^(1 << 7) = 1001 & (^1000) = 1001 & 0111 = 0001
下面是位图的代码实现:
type Bitmap struct{
	arr []int64
	size int
}

func BitMapConstructor(size int) *Bitmap{
	arr := make([]int64, getBitInArrIdx(size-1) + 1)
	return &Bitmap{size:size, arr:arr}
}

// 获取某个位下标对应的数组下标
func getBitInArrIdx(bitIdx int) int{
	return bitIdx >> 6
}

// 将位下标idx下的位置为1
func (this *Bitmap) setBit(idx int){
	if idx >= this.size{	// 超出范围
		return
	}
	arrIdx := getBitInArrIdx(idx)
	this.arr[arrIdx] |= int64(1) << (idx % 64)
}

// 将位下标idx下的位置为0
func (this *Bitmap) unsetBit(idx int){
	if idx >= this.size{	// 超出范围
		return
	}
	arrIdx := getBitInArrIdx(idx)
	this.arr[arrIdx] &= ^(int64(1) << (idx % 64))
}

// 获取位下标idx位置的值
func (this *Bitmap) getBit(idx int) bool{
	if idx >= this.size{	// 超出范围
		return false
	}
	arrIdx := getBitInArrIdx(idx)
	return this.arr[arrIdx] & (int64(1) << (idx % 64)) != 0
}
